아래 글은 오래 되어 도커 이미지 등이 삭제 되었으니 공부 차원이 아니라 이용을 하려면 아래 확인 하세요 ‘ㅅ’a
OCI arm 인스턴스에서 docker로 web, was 사용
OCI 에서 제공 되는 “항상 무료 적격” 서비스에 ARM64 서버로 Apache, Php, MariaDB 를 운영 하고자 하였으나
aarch64 커널에서는 snapd 설치가 가능하지만 lets encrypt 사용이 불가능 하여 불가피 하게 x86_64 서버를 앞에 하나 두어
reverse proxy 할 계획을 세우다 보니 HTTP/3 를 적용하는 부분도 포함해 진행 한다.
알고 가야 하는 부분은 http3 를 구현 하는 nginx-quic 의 경우 아직 테스트 레벨이라는 점이다.
tier 1 = x86_64 – oracle linux 8 – nginx
tier 2 = arm64 – oracle linux 8 – memcache, docker – amazon linux – httpd, php-fpm
tier 3 = arm64 – oracle linux 8 – mariadb
아래 두 글에 이어서 익숙하겠지만 그것을 한다.
1 2 3 4 5 6 7 8 9 10 11 12 13 14 15 16 17 |
# 타임존 설정 ~]# ln -sf /usr/share/zoneinfo/Asia/Seoul /etc/localtime # oracle-epel-release 활성화 (이부분은 oracle-epel-ol8.repo 에서 enabled=0 처리가 되어 있어서 하는 부분..) ~]# yum-config-manager --enable ol8_developer_EPEL ol8_developer_EPEL_modular # OS 업그레이드 ~]# dnf -y upgrade # 업그레이드 후 재부팅 ~]# reboot # 필수 프로그램 설치(sealert, htop, pstree) ~]# dnf install psmisc htop setools-console setroubleshoot-server # vim 사용 설정 ~]# echo "alias vi=vim" >> /etc/bashrc |
편리한 dnf(yum) 설치를 위해 codeit.guru 레포지토리를 추가 한뒤에 nginx:codeit-quic 설치를 한다.
|
|
~]# dnf install -y https://repo.codeit.guru/codeit-repo-release.el8.rpm ~]# dnf module enable -y nginx:codeit-quic ~]# dnf install -y nginx ngtcp2 nginx-module-image-filter GeoIP-GeoLite-data brotli snapd |
snapd 를 활용하여 Let’s encrypt 를 설치 한다.
|
|
~]# ln -s /var/lib/snapd/snap /snap ~]# systemctl enable --now snapd.socket ~]# snap install core ~]# snap refresh core ~]# snap install --classic certbot ~]# ln -s /snap/bin/certbot /usr/bin/certbot |
웹서버의 보안 향상을 위해 Diffie-Hellman param 파일을 생성한다.
|
|
~]# mkdir /etc/pki/nginx ~]# openssl dhparam -out /etc/pki/nginx/dhparam.pem 4096 |
서버 내부의 파이어월에 사용할 서비스 및 포트를 등록 하고 확인 한다.
|
|
~]# firewall-cmd --add-service=http --add-service=https --permanent ~]# firewall-cmd --add-port=443/udp --permanent ~]# firewall-cmd --reload ~]# firewall-cmd --list-all public (active) services: http https ssh ports: 443/udp |
nginx.pid 생성, /var/www/html 엑세스(Let’s encrypt 인증서 http 인증) 및 리버스 프록시 구현을 위한 selinux 를 설정 한다.
|
|
~]# setsebool -P httpd_can_network_relay 1 ~]# setsebool -P httpd_graceful_shutdown 1 ~]# setsebool -P nis_enabled 1 ~]# semanage fcontext -a -t httpd_var_run_t "/var/run/nginx.pid" ~]# semanage fcontext -a -t httpd_sys_content_t "/var/www/html(/.*)?" |
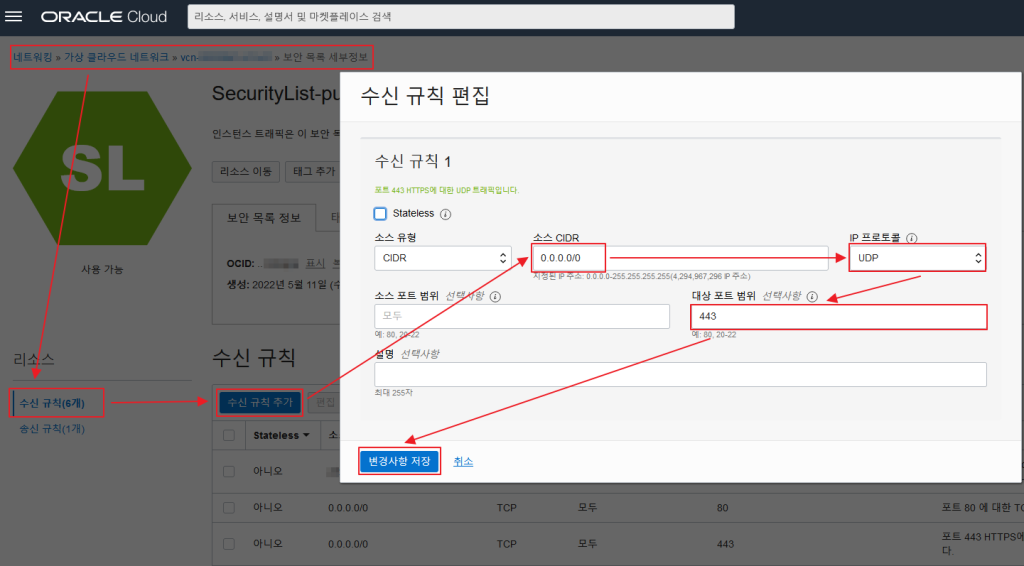
OCI 클라우드 내에서의 보안 목록(Security List) 에서 아래와 같이 UDP :443 을 허용해 준다.
/etc/nginx/nginx.conf 파일을 수정 한다.
1 2 3 4 5 6 7 8 9 10 11 12 13 14 15 16 17 18 19 20 21 22 23 24 25 26 27 28 29 30 31 32 33 34 35 36 37 38 39 40 41 42 43 44 45 46 47 48 49 50 51 52 53 54 55 56 57 58 59 60 61 62 63 64 65 66 |
user nginx; worker_processes auto; error_log /var/log/nginx/error.log notice; events { worker_connections 1024; } http { include /etc/nginx/mime.types; default_type application/octet-stream; charset utf-8; geoip2 /usr/share/GeoIP/GeoLite2-Country.mmdb { $geoip2_data_country_iso_code country iso_code; } log_format main '$host $remote_addr - $remote_user [$time_local] "$request" ' '$status $body_bytes_sent "$http_referer" "$http_user_agent" $geoip2_data_country_iso_code'; access_log /var/log/nginx/access.log main; keepalive_timeout 65; server_tokens off; sendfile on; brotli on; brotli_types text/css text/x-component application/x-javascript application/javascript text/javascript text/x-js text/richtext image/svg+xml text/plain text/xsd text/xsl text/xml image/x-icon application/octet-stream; gzip on; gzip_vary on; gzip_types text/css text/x-component application/x-javascript application/javascript text/javascript text/x-js text/richtext image/svg+xml text/plain text/xsd text/xsl text/xml image/x-icon application/octet-stream; etag off; resolver 8.8.8.8 8.8.4.4 valid=300s ipv6=off; resolver_timeout 5s; server_names_hash_bucket_size 128; ssl_trusted_certificate /etc/pki/tls/certs/ca-bundle.crt; ssl_dhparam /etc/pki/nginx/dhparam.pem; ssl_session_tickets off; ssl_session_timeout 24h; ssl_session_cache shared:SSL:30m; ssl_protocols TLSv1.2 TLSv1.3; ssl_ciphers ECDHE-ECDSA-AES128-GCM-SHA256:ECDHE-RSA-AES128-GCM-SHA256:ECDHE-ECDSA-AES256-GCM-SHA384:ECDHE-RSA-AES256-GCM-SHA384:ECDHE-ECDSA-CHACHA20-POLY1305:ECDHE-RSA-CHACHA20-POLY1305:DHE-RSA-AES128-GCM-SHA256:DHE-RSA-AES256-GCM-SHA384; ssl_buffer_size 8k; ssl_stapling on; ssl_stapling_verify on; ssl_prefer_server_ciphers on; client_max_body_size 100m; client_body_buffer_size 10m; proxy_request_buffering off; proxy_connect_timeout 90; proxy_send_timeout 90; proxy_read_timeout 90; proxy_buffers 32 256k; proxy_buffer_size 128k; proxy_busy_buffers_size 256k; include /etc/nginx/conf.d/*.conf; server { listen 80; server_name _; root /var/www/html/; deny all; expires off; location / { index index.html index.htm; } error_page 403 404 500 502 503 504 /50x.html; location = /50x.html { root /usr/share/nginx/html; internal; } } } |
Let’s encrypt 인증서 발급을 위한 http 가상호스트를 수정 한다. vi /etc/nginx/conf.d/default.conf
|
|
server { listen *:80; server_name www.enteroa.com enteroa.com; location ^~ /.well-known/acme-challenge/ { root /var/www/html/; } location / { return 301 https://$host$request_uri; } } |
conf 파일을 설정한 뒤 nginx 를 활성화 및 시작 한다.
|
|
~]# systemctl enable --now nginx |
Let’s encrypt 인증서를 발급 한다. (성공시 Successfully received certificate 메세지 가 확인 된다.)
|
|
~]# certbot certonly --server https://acme-v02.api.letsencrypt.org/directory \ --rsa-key-size 4096 --agree-tos \ --email 자신의@이메일.주소 --webroot -w /var/www/html \ -d www.enteroa.com -d enteroa.com Successfully received certificate. Certificate is saved at: /etc/letsencrypt/live/www.enteroa.com/fullchain.pem Key is saved at: /etc/letsencrypt/live/www.enteroa.com/privkey.pem |
https 가상호스트 설정 파일을 추가 생성 한다. vi /etc/nginx/conf.d/default-ssl.conf
1 2 3 4 5 6 7 8 9 10 11 12 13 14 15 16 17 18 19 20 21 22 23 24 25 26 27 28 29 30 31 32 33 34 35 36 37 38 39 40 41 42 43 44 45 46 47 48 49 50 51 52 53 54 55 |
upstream WasProxy01 { ip_hash; server 프록시.대상.서버.아이피:80; # WAS 서버 IP를 넣는다. } server { # www가 없는 도메인은 www.도메인 으로 이동하도록 한다. listen 443 ssl http2; server_name enteroa.com; location / { return 301 https://www.$host$request_uri; } ssl_certificate /etc/letsencrypt/live/www.enteroa.com/fullchain.pem; ssl_certificate_key /etc/letsencrypt/live/www.enteroa.com/privkey.pem; add_header Strict-Transport-Security "max-age=31536000; preload"; } server { listen 443 http3 reuseport; # 한개의 nginx 에 하나의 http3 만 선언이 가능하다. listen 443 ssl http2; server_name www.enteroa.com; proxy_redirect off; proxy_set_header Host $host; proxy_set_header X-Real-IP $remote_addr; proxy_set_header X-Forwarded-For $proxy_add_x_forwarded_for; proxy_set_header X-Forwarded-Host $server_name; proxy_set_header SSL_PROTOCOL $ssl_protocol; proxy_set_header SSL_CLIENT_CERT $ssl_client_cert; proxy_set_header SSL_CLIENT_VERIFY $ssl_client_verify; proxy_set_header SSL_SERVER_S_DN $ssl_client_s_dn; proxy_hide_header Upgrade; if ( $request_method !~ ^(GET|POST|HEAD|OPTIONS)$ ) { # 사용가능 메소드 제한 return 405; } location = /robots.txt { # robots.txt 로그 남기지 않음 access_log off; } location = /favicon.ico { # favicon.ico 로그 남기지 않음 access_log off; } location ~ /\. { # dot(.)으로 시작 되는 파일의 접속 차단 deny all; } location ~ ~$ { # dollar($)으로 시작 되는 파일의 접속 차단 deny all; } location / { proxy_pass http://WasProxy01; } ssl_certificate /etc/letsencrypt/live/www.enteroa.com/fullchain.pem; ssl_certificate_key /etc/letsencrypt/live/www.enteroa.com/privkey.pem; quic_retry on; ssl_early_data on; add_header Alt-Svc 'h3=":443"; ma=86400,h3-29=":443"; ma=86400,h3-Q050=":443"; ma=86400,h3-Q046=":443"; ma=86400,h3-Q043=":443"; ma=86400,quic=":443"; ma=86400; v="46,43"'; add_header QUIC-Status $http3; add_header Strict-Transport-Security "max-age=31536000; includeSubDomains; preload"; add_header Content-Security-Policy-Report-Only "default-src https:; script-src https: 'unsafe-eval' 'unsafe-inline'; style-src https: 'unsafe-inline'; img-src https: data:; font-src https: data:"; } |
default.conf 파일과 default-ssl.conf 파일은 하나로 병합해서 사용 해도 관계는 없다.
가상 호스트를 생성 한 뒤 nginx 를 reload 한다.
위까지 진행 한 경우 http3 를 지원 하는 웹서버의 설정이 모두 끝난다.
다만 구성상 외부서비스 제공은 https 내부에서의 통신은 http 프로토콜을 사용하기 때문에 기본 상태의 wordpress 의 에러메세지를 볼 수 있다.
was 서버에서 운영되는 워드프레스의 wp-config.php 파일에 /* That's all, stop editing! Happy blogging. */ 위 부분에 아래 소스를 삽입 해야 한다.
|
|
if ((!empty( $_SERVER['HTTP_X_FORWARDED_HOST'])) || (!empty( $_SERVER['HTTP_X_FORWARDED_FOR'])) ) { // http://wordpress.org/support/topic/wordpress-behind-reverse-proxy-1 $_SERVER['HTTP_HOST'] = $_SERVER['HTTP_X_FORWARDED_HOST']; // http://wordpress.org/support/topic/compatibility-with-wordpress-behind-a-reverse-proxy $_SERVER['HTTPS'] = 'on'; // rewrite blog word with wordpress //$_SERVER['REQUEST_URI'] = str_replace("wordpress", "blog", $_SERVER['REQUEST_URI']); } |
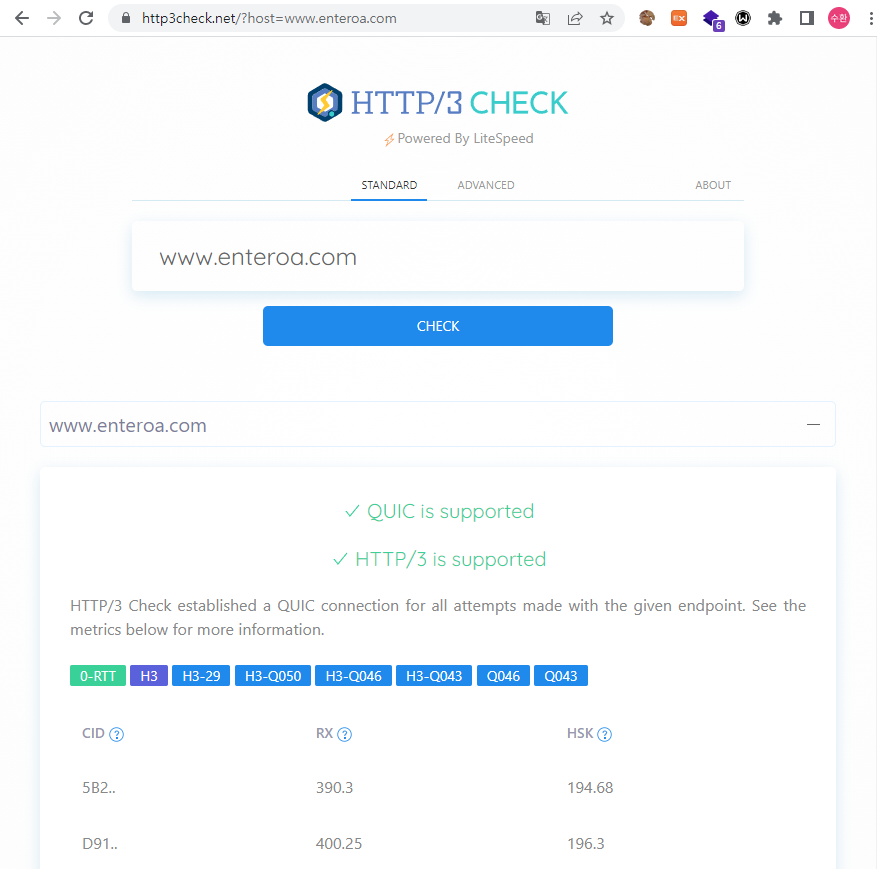
브라우져 접속 및 체크 사이트(https://http3check.net/) 접속을 통해 HTTP/3 이 활성화 되었는지 확인 한다.